Monday, September 26, 2011

old picture frame

I needed a piece of "art" for my porch and remembered a few cheap frames I had stashed away. I love to scrapbook and thought I would do a little for this project. Turned out so cute and I didn't have to buy a thing! These flowers are my new favorite thing to do--have made dozens in the last month! :)


Aren't they adorable?! O.k., I know you're dying to try them, so here's how:
  • tear 3 different size circles out of heavy cardstock (you can use patterned paper, just have to be more careful with it as it will tear easily). Hint: I trace circles using different size cups or whatever I have on hand, and then tear around the circle, but you can freehand them too
  • with each circle tear 5 lines from outside edge toward center (don't worry if they're not evenly spaced, it won't matter). Don't tear too far into middle or one of the petals might fall off when you do the next step. They don't have to be perfect, as a matter of fact the less perfect they are the better I think they look!
  • after tearing the petals you can ink the edges if you want, or not--cute both ways.
  • crumple the circles. With the heavy cardstock I just put them in the middle of my palm and squeeze. With lighter paper you want to be a little more gentle.
  • uncrumple and stack
  • poke hole through the center {you don't just want to try to jab a brad through because you might tear it and, again, the petals will fall off! ;) } and insert brad
  • now you can just leave it as is, but I like them to have a little more "body" so I spray them with a clear coat poly several times and "squish" them again while they are a little damp
  • ENJOY! I use them for all kinds of things--recently decorating a cork board for the back of my computer desk with them--so cute!

identity crisis!

I saw this in the window of a thrift shop uptown and knew I had to have it. (Hello--chunky AND curvy?!!) I eyeballed it for two weeks before I finally went in and bought it. I practically walked away with it for free! Love that! I told Craig what a cute bench I thought it was and he said, "That's not a bench, it's an 80's coffee table." I told him I didn't think so, and he said, "It doesn't really matter what you think, it can be whatever the person who buys it wants it to be." O.k., so one of the reasons I love him so much is because he never has a problem with telling it like it is! :) I was going to do something fun(ky) with it but decided on basic black. Maybe next time I'll be brave enough!
before


after


Check out her CURVES!


{can so see this in an entry way as a bench ;) }

SOLD

book wreath

I saw this book wreath on another blog and thought I would try my own version. There are all sorts of tutorials online. I'm an avid book lover and couldn't stand the thought of tearing the pages out of any my books!, so I just picked up a paperback at the dollar store (I ended up needing about 300 pages). It took a little over an hour to put together, but it was an inexpensive, fun little project. Side note: The book was about Elvis so I didn't mind quite so much when I had to "disassemble" it--sorry Elvis fans!


what got me started

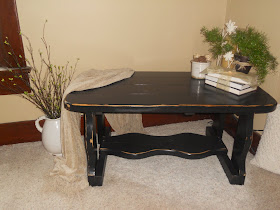
I've been playing around with the idea of painting my furniture for quite some time now, but never had the guts to take the plunge. Really, one of our only pieces of "real" furniture is our coffee table. It was beautiful in its prime, but a little mishap with finger nail polish remover (by someone who shall remain nameless because I love her!) and 10 years of wear and tear had taken its toll. So, I decided to do it and am so glad I did! I love just looking at it! :)

Sorry, no before pics--I was too excited to get started.


Sunday, September 25, 2011

waiting for the paint to dry

It was cold and rainy yesterday, so what better thing to do with my time than paint! Decided inside was better than out, but we are minus a furnace right now, so it was a little chilly in the house and the paint was taking a while to dry. So, I found another project to work on while I was working on my project--sometimes I just can't help myself! [I also completed an assignment for one of my classes, so I wasn't just having fun... ;) ] I found this crate in my basement that I forgot I had, but it still looked pretty new--aside from one of the handles being moldy and chewed through by a mouse and creepy crawlies coming out of every nook and cranny! I had so much fun with it and even my 11 year old said it was "cool"--can't think of a better compliment! :)


Before


After


these little beauties are from my garden <3
Couldn't resist this shot--two of my great loves--reading and flowers!

Friday, September 23, 2011

sweet chair


A friend, who knew I was itching for a project, brought me this sweet little chair she found at a rummage. Since I was just getting my feet wet I appreciated starting with a miniature. :) I knew, as soon as I saw it, what I wanted to do with it--that doesn't happen very often. Loved having the chance to use a little color!


I'm just learning how to take pictures, too, and stink at it so forgive me--hope practice helps!


I love distressing, but the color was so beautiful I had a hard time roughing it up!


Doing the paper on the seat was another first for me. It gave me fits the night I was doing it, so I just washed my hands of it and left it on the table overnight. The next morning when I got up I was afraid to look at it, but it had dried completely flat and perfect! So, YES!, I believe in miracles!!!


Love how it turned out.
color is "raindrop" by SW

SOLD