Thursday, September 25, 2014

Vintage Buffet in Interesting Aqua

It's been a busy week and I'm tired!
 
 I love this style of buffet.  This one was interesting because some of the drawer bottoms were made out of oak and some of them were made out mahogany.  Not sure what's up with that, unless someone completely rebuilt two of the drawers at some point.
  Anyway...
It was in pretty rough shape.  Lots of dents and dings.  At one point my client had painted the top black and wasn't happy with it.  She decided she wanted it refinished dark and I thought that was a great choice. ;)
 
She chose Interesting Aqua from Sherwin Williams.  You know how I feel about these soft blue/greens.  LoVe them!  It always amazes me how paint colors can look so different depending on what light they're in.  I had to hold up the color card to the piece when I was finished with it to see if it really was the same color (and it was)!  It looks blue, soft turquoise, or a little gray depending on the light. 

Before
 
I know you can't tell from the pic, but there were lots of "marks" on this buffet. 


After

 
It looks a little brighter in the pic than it really is. 


 The top was full of deep scratches.  Thankfully most of them sanded out.  When it was bare it looked pretty rough.  But, I love how the Java Gel (General Finishes) made the beautiful grain come back to life and deepened the color of the marks I couldn't get out.  It really is a pretty piece of wood still.


 Same as the last set, I used ProClassic modified latex.  You can see what a gorgeous finish it gives.  Would highly suggest for any first time paint DIY'ers as well!  It levels out nicely minimizing brush strokes.


 These are the only  mums I bought this year!  Can you believe that?!  What is wrong with me??


 I just love the contrast between a lighter color paint and a dark top.  The dark wood from the top and peeking through the paint really does something for the color.  Paint color can look flat if there's nothing contrasting it.  That's why I love leaving the top (or drawer fronts) natural if I can, or using white on the details.  
 
 
We kept the original hardware and I used my trusty Oil Rubbed Bronze on it.


Custom: Not For Sale

Tuesday, September 23, 2014

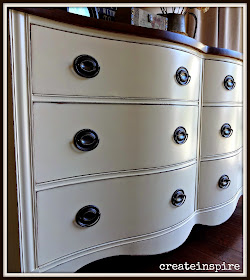
Drexel Dresser in Creme

I've painted all kinds of stuff over the last 3 years.  From the lowliest of pieces (particle board and doggie steps) to the best the furniture industry has to offer.  This dresser happens to be in the second category.  I don't see Drexel come through my garage doors very often, but I was salivating (that's actually a pretty gross image, huh) when I saw what was on the trailer that pulled into my driveway.  I couldn't wait to get started on this beautiful piece!  My client wanted it cream with dark hardware and a wood top.  One of my favorite combos!  And, it is so suited to this classic beauty!


 Before
I don't get very many pieces where everything works the way it should, so I was absolutely thrilled when I opened all the drawers and they slid so beautifully!  Thank you, oh thank you, Drexel!!


  I almost always sand the top down on a piece regardless if I'm painting or staining.  I am a sucker for a wood top and even if I'm painting I just have to know what's under there! In this case it's a beautiful piece of mahogany veneer.  So pretty!  I have been burned by doing this--once I sanded down the top and it was a solid piece of cherry.  It was so beautiful, but my client didn't want the top wood so I had to paint over it!   I think I cried a little. ;) 
 
 It really was a privilege to work on this piece!


 After

 
I just want to lick touch it.  It is seriously so pretty.


 I mentioned in my last post that I used a modified latex from Sherwin Williams (ProClassic) for this set.  Even though it levels out so nicely (I love watching it melt) I still sand between every coat.  It just feels wrong not to.  I know, I'm strange.


 Again, the hardware received two coats of Oil Rubbed Bronze from Rustoleum.  I always prime my hardware before spraying it as well.


 Here's that gorgeous top.  When I sand a top down I use 150-180 grit.  I used to use a more aggressive grit, but it left marks in the top and it was just more sanding to get them out.  150/180 is tough enough for most finishes (although it may take a few more sheets) and fine enough where I can buff out any swirlies with it.  I always look at the top at an angle in the sun to see the fine scratches so I can sand them out.  Then 1 coat of Java Gel from General Finishes and 4 coats of Minwax Polycrylic in Satin.


 Hyndrangeas from my garden.  I normally don't like to cut my flowers, but I couldn't stand the thought of these turning brown on the bush!


Look at those curves!!


 I love this warm white for fall too!


Custom: Not for Sale


Saturday, September 20, 2014

Drexel Side Table in Creme

Yesterday, while waiting to get football pics done with our boys, someone who follows my page said she hadn't seen me posting much lately.  Now that school has started again I will be posting more, but sometimes "stuff" happens.  Last week I finished 3 custom pieces, but because of circumstances I didn't get pictures taken.  So, I have been painting, just not posting! :)  This next few weeks I have some fun projects coming up though and this little Drexel side table is part of a small set I will be working on. 
 
It's so classic in cream with a dark top and dark hardware. I never get tired of this combo. 
 
It was a little rough.  The finish was so worn and I was worried about bleed through because it's mahogany and I was doing white.  I decided to sand it all down to the bare wood and start from scratch for the best finish possible and to minimize any problems.
 
After sanding it down I followed with three coats of shellac (just to be safe!) and then used  a modified latex (which means it's latex but levels out like oil, so nice) from Sherwin Williams in Crème. I also did one coat of Java Gel from General Finishes for the top and then followed with 3 coats of poly. 

Before
I could just hear it saying, "Help me!" :)


After


I distressed lightly (it always scares me when it's mahogany or cherry and I'm doing white) and had no problems with bleeding around the edges.  Phew!


I have a soft spot for this kind of hardware.  I just  gave it a coat of Oil Rubbed Bronze. 


I love the modified latex (ProClassic).  It levels out beautifully and minimizes the need for sanding (although I still do).  It's silky smooth.  Gorgeous!


She's come a long way!


Wednesday, September 10, 2014

Antique Vanity and Sunflowers

I've had an awesome lowboy sitting in my garage for a couple of months now and I've been deciding on what to do with it.  I finally decided, but time has gotten away from me and I haven't gotten around to doing it yet. I wanted to do it the first week school started, which was the first week of September and I knew I wanted to stage it with sunflowers when I was done.  My neighbor across the street had a beautiful patch of sunflowers and I asked her if she minded if I cut a few.  She said I could help myself (so sweet!), but I didn't want to cut them too early and have them wilt before I could use them.  I was almost as excited about the sunflowers as I was about the piece. haha  

Well, I still haven't gotten around to doing the piece and the sunflowers are quickly fading now! We've had a lot of rain and it's been windy and I was worried I would  miss out.  I went over yesterday and her hubby let me pick the two they had left.  They were beautiful but I needed more.  So, I drove around town until I saw another patch in someone's yard and went right up and asked her if I could cut her sunflowers.  I never do stuff like that, but I was desperate! :)  She said I could!  So, here's a shout out to all you lovely people in my community who were willing to help a gal stage her furniture for her blog! 

Like I said, I haven't completed the lowboy yet, but a client brought me this antique vanity, so I used the sunflowers on it. ;)
\


 Before
Not only do you get to see the before you get to see all the junk in my garage!  Well, that's life folks. :)
This piece had burled maple veneers over mahogany! Can you believe that?  The veneer wasn't in great shape anymore, it's a little warped, and someone had already stripped white paint off of it.  It had also been sitting in a basement for years and the wood was discolored. It's a solid piece though and I love the details! 


 After


Black has the ability to dress any piece up, but what I love about this particular one is it still has a rustic feel after the distressing.  


 All the original hardware had been removed at some point.  We decided on keeping the pulls for the bottom drawers because they were unique and then just filled holes in the smaller drawers and added new knobs. 


 I love a beautiful piece of wood, but I also love the pieces that carry scars.  These tops have so much character and keep the piece from feeling too stuffy.  Maple is a hardwood so it doesn't stain as darkly as a piece of mahogany or cherry would. 


 I used to hate cracks and dings because I felt like they marred the finish, but I'm embracing the imperfections more and more.  This baby has lived a long life and is still kicking so I will celebrated her cracked facade and salute her many years of service to come (and looking awesome while doing it)!


 It was raining buckets while I was taking these pics, but I had a little sunshine in the garage with me. :)