Thursday, October 30, 2014

Painting MDF: An 80's redo

I can't believe I forgot to take a before pic!  I hate when I do that--sometimes you just can't appreciate where it's at unless you've see where it's been! :)
 
This was a typical 80's style dresser with those hideous, fat "airplane" pulls (as I so fondly refer to them as).  My client wanted to update it with black and cup pulls.  When I started working on it I realized it wasn't wood.  No part of it.  It's MDF with, what I call, a "sticker" over it.  Lot's of people think you can't paint this type of furniture, but you most certainly can and it looks just as amazing as the real thing.  Another fallacy is that all "particle board" or MDF is junk.  That's simply not true.  Now, certainly any piece of furniture purchased from Walmart, or the like, isn't going to be high quality, but I've worked on plenty of pieces that have been particle board and they were good, solid pieces of furniture. 
 
*I would not paint a piece of furniture made out of particle board if the existing finish is in rough condition, meaning bubbles, peeling, or open spots where the MDF has been exposed.  These can't be smoothed out by sanding. 


 After
 
 
I do go over this on my "How I Paint" tab, but I'll just give a quick run down here of what I did.  First of all, this piece had a high gloss finish on it.  I used 150 grit sand paper to take of the shine, but did not get too aggressive with it as you don't want to sand down to the actual MDF.  After I gave it a good scuff sanding I primed it with Rustoleum Painter's Touch primer which is meant to be used for wood, plastic, metal and apparently MDF with a sticker on it! :)  You could use a good adhesive primer as well.  The trick is to not go too heavy with the first coat as you don't want to saturate the surface with wet paint.
 
Then I just gave it too coats of All Surface Enamel in stock black from Sherwin Williams, let it dry really well, and then finished with 2-3 coats of poly (I'm back to Varathane again). 
 
 
The finish is just as nice as on a real wood piece.


 We updated the hardware with cup pulls and new knobs to bring it into the right decade and I just sprayed the existing handles on the middle doors with Rustoleum Painter's Touch in Semi-gloss black.


It's sharp looking now and ready for a modern bedroom. :)

Thursday, October 23, 2014

The Knob

This week just flew by!  I'm not sure if it's because the weather has been a little gloomy this week or if it's because Jack Frost is nipping at my nose, toes, and every where else, but I have had a serious lack of motivation lately!  Yep, I'm in a slump.  Custom orders keep me going because I can't stand the idea of keeping people waiting, so thank goodness for that or I might still be wrapped in a blanket and curled up with a book instead of out in my garage!
 
I've done a few antique sewing machine tables and I still love them.  I think they make the best before/afters because all most of them are just so outdated.  I wonder how many of these I've walked by in my life and not even given them a second look? 
 
They usually have nice clean lines and  I'm always taken by their long legs. ;)


Before
 
The finish on this one was very old and flaky so I ended up sanding it all down to the bare wood.  I used an orbital sander on the top and sanded the rest by hand.  I know people are tempted to skip this step, especially if they're using chalk paint, but your final finish can only be as good as what you start with.  So, if your original finish is rough it will show under your paint job (in the form of ridges, etc).  Sometimes I like this look, especially if glazing or dark waxing but this guy was going off-black, so I wanted it to be smooth.
 
*Sometimes, if using a rougher grit sand paper to remove the old finish, you can leave scratches that will show through your paint.  To avoid this simply sand in the direction of the grain.  It will help eliminate those scratches and "swirlies".  Of course, you can always sand with a finer grit until they are gone, too. 


 After
 
Black is always classic and charcoal is no different.  Still a great neutral but it's black's soft side.  Love the warm tones of the wood with it, too.


 Seriously, isn't this knob amazing?!
 
  There is a little story behind it.  Last year I had an itch for coral.  I've used Hobby Lobby knobs so many times so I was looking for something a little different.  I started browsing the web and found this amazing coral rosette on Anthropologie.  I fell head over heals.  Only one problem.  It was $17!  Yes, $17 freaking dollars!!  What's a girl to do?  I hemmed and hawed and tried to justify it.  I finally decided to put ONE in my cart because I just could not let it remain an abstract object out in cyberspace.  Somehow, putting it in the cart made it real and MINE.  It sat there for a few days, and then I finally pulled it up again, with the intention of removing it and moving on....ok...that's a bald face lie (look up the origin of that expression, fascinating).  I had no intention of doing anything but purchasing it.  So, I did.  I bought one stinking knob!  I had no idea what I was going to do with it, but I had the pleasure of unwrapping it and rolling it around in my greedy little hands.  And, then it was placed in the knob bin in my garage and it's been there ever since.  Crying out to me.  Begging to be shown to the world.  It wanted to be SEEN. 
 
I could deny it no more, so it's making its debut on this pretty little sewing table.  I have no idea if my client wants it, and if she doesn't then it will go back in the bin and I will cry tears of disappointment until I, again, find the perfect piece for it to make its forever home. 
 
I can't believe I just wrote all of that for a knob....


 Sand, people, sand!!


There was a pretty piece of mahogany veneer under that ugly old finish.  I sanded it down to the bare wood, gave it one coat of Java Gel, and 3 coats of General Finishes topcoat in flat.  I L.O.V.E. it!  I've always been a Satin girl, but I think I'm converted! 


 Have a lovely weekend!

Wednesday, October 22, 2014

Antique Lowboy w/ Mirror

 
While I was trying to figure out what I was going to do this winter (because I totally didn't want to work in my garage with a propane heater again) I had decided I was done taking furniture.  But, you know how that goes. As soon as I decide that then someone tags me on FB and I am faced with a moral dilemma.  Ok, so maybe it's not a moral dilemma.... but a dilemma nonetheless. It sure is hard to say no to some things!  I told myself just one more piece wouldn't hurt, and as soon as I justified purchasing this sweet little lowboy I was in hubby's truck, son in tow, to go pick it up.
 
I'm glad I didn't say no. ;)
 
Btw, did I mention that I have THE BEST HUBBY in the world?!  I know I've said it before but I'm going to say it again because it's so true!  He said he had to go run an errand the other day and came back with a pellet stove for the garage!  So, now I don't have to paint in stinky propane fumes and have a cozy fire to work by to boot!  How lucky am I?  I truly don't deserve that man.
 
 
 Before
 
Isn't she so sweet?  I love the curvy top drawers.
 
I just finished two red dressers so it was time to go a little softer again.  I'm STILL in love with soft turquoises and I have a ton of left over paint, so I decided to mix my own again.  I can't get enough of a grayed out turquoise that's a little on the green side (which for some reason never shows very well in pics, so you'll have to trust me).


 After


There isn't anything I don't love about this one.  The color, the hardware, the distressing, the wood top, the keyhole, the details...

This one was tiger oak but the veneers were in pretty rough shape, cracked and peeling.  I had to remove the veneer from the top and fortunately there was nice wood for the sub.  I sanded it smooth, stained it with Java Gel for good coverage, and then sealed it with Minwax Polycrylic.  Now that my gallon is gone I will probably switch back to Varathane or General Finishes top coat. 


 These antiqued pewter knobs are still one of my faves and I love them with this washed out color.


This piece has just the right amount of detailing and I wanted to highlight it.
 
It's funny because when I first started painting I didn't really think I had a "style".  Now, as I look at my pics I can definitely see my style and I'm glad it's morphed into something of my very own. 
I've never wanted someone to be able to say of me that I've copied their work and I can see how my work is MY work.  I don't know if that makes sense to you, but it does in my head so we'll just go with it. :)


 Detail on the top of the mirror.


 I still love these cup pulls too.  I never get tired of a cup pull!


Saturday, October 11, 2014

Vintage Lowboy in Tuscan Red

 
 Pure luck is what brought this vintage lowboy and I together.  My hubby asked if I wanted it and I said (with an extremely confused look on my face because I can't believe after all this time he would even think he needed to ask), "Uh, yeah!"  (Duh, honey.)
 
He said it was ugly and I almost kicked him out of my garage.  Ugly?  Pphttt!
 
I have a super soft spot for lowboys. It's bad.  It doesn't really  matter what they look like, I love em.  This one was an empire AND curvy!!  The lowboy of my dreams!  I drooled all over it and then made myself finish up my custom work before I got my little hands on it.
 
And, I had another fabulous piece of luck.  I love General Finishes products, but I can only get the Gel Stain close to me.  And, if you haven't figured it out by now I'm kind of a cheapskate, so I shy away from ordering paint products online unless I just absolutely can't live without it. 
 
I was in contact with Tara from GF about the recent dresser I refinished with the wood drawer fronts.  She asked if I had ever used their milk paint(which is not a true milk paint, but an acrylic) line and I hung my head in shame as I told her, no, I hadn't.  Well, guess what showed up in the mail a week later?!  You guessed it!  A box full of goodies.  I was so thrilled and ripped that sucker gently opened the box to see what was inside.  There were three cans of paint and a topcoat.  Oh boy!  One of the colors was Tuscan Red and I knew immediately that fate had intervened for my little lowboy.  A perfect combination!
 
I know, I know.  You want to see the pics.  Just hold your horses cuz I have to tell you about this paint.  The consistency is perfect.  Now, I've heard amazing things about GF paint, but I wanted to test it myself so I whipped out my brush and brushed the drawers of this lowboy.  I still sanded between coats, but I'm not sure I even needed to.  It levels beautifully and covers like a dream.  If you have been on my FB page I posted a pic of the drawer fronts and ppl were asking me if I sprayed them.  It's that good!   I'm dead serious when I tell you I only did 2 coats on most of the dresser.  Two coats!  For red!!  If you've ever painted with red you know two coats is unheard of. 
 
Bottom line.  I love LOVE it!  Big, huge, ginormous shout out to General Finishes and you can find them on FB  here.  If you haven't tried their products you are definitely missing out!!


Before


After


That is one sexy piece of furniture I tell ya!  (sorry mom)


 I bought these knobs as a "just in case" for the white vanity I recently finished and was so glad I decided not to use them because they are so perfect against this deep red. 


This is the finish I was talking about.  AmAzInG, right?!!  Like silk. They recommend to sand with 220 between coats, which is what I always do anyway.  I promise you, you WILL notice a difference in your finish if you sand, sand, sand!!  It's a dirty job but your furniture will thank you for it.


 So many times I get pieces where the keyholes are there but the covers are missing.  I was so happy to see they were all there! I simply popped them off (be careful doing this), painted, and then put them back on.  I also loved these simple, flat black knobs for the smaller drawers.


 The grain in this top is amazing and I definitely did not want to paint it.  It's a hardwood so didn't take stain as well as a softer wood would, but Java Gel from General Finishes didn't let me down.  It's a beautiful piece of wood.


This piece is
SOLD!!

Thursday, October 9, 2014

Vintage Vanity in French Vanilla

I have a soft heart.  I can't help it.  I feel sorry for lost kitties, sad babies, heartbroken teenagers, bugs on their backs, and ugly furniture!
 
So, when my client brought me this little vanity and said, "I'm not sure you can do anything with it."  I took it as a personal challenge because, let's face it, it definitely fit in the ugly furniture category!
 
Someone, bless their heart cuz I am not here to judge, tried to "revive" it by giving it some sort of hideous, drippy, stain wash.  I'm not sure how old or experienced they were or what their intention was, but it was definitely a project gone wrong.  I know you can't tell from the picture, but you will just have to trust me when I tell you it was bad!
 
It's actually a very pretty little vanity with great bones and she chose a very neutral color which I think compliments it beautifully.  Sometimes simple is best (and always versatile and classic!).
 
 
 Before
Poor, poor baby!


 After
 
Much better!  Like a breath of fresh air!


 She's not sure she wants to reuse this stool, so I covered it in a piece of left over fabric for the mean time. It looks very "springy", but just imagine it with an orange pumpkin on it and we're all good. 
*pssst, I actually love turquoise and orange together!


 When I was done she whispered "thank you" to me.  The vanity, not my client, silly!  I didn't let my client see it yet.  I'm kind of a witch that way. ;)


 Every girl needs some bling and I think the gal this is going to will appreciate a diamond (yes, they're fake, but don't burst my bubble please!) encrusted knob, or 4!


 After the chippy red dresser I sadly admit I reverted to my old ways and put the polish
 on that finish. ;)


color = French Vanilla from SW


Wednesday, October 8, 2014

Ode to Fall: Dresser in Tricycle

I'm not much of a seasonal decorator.  In fact, if it weren't for the cute pouty face of my almost 10 year old daughter I probably would do no seasonal decorating.  I know.  I'm a stooge.  The thought of getting it all out and then having to put it all away gives me anxiety.  I am no different when it comes to painting really.  I paint whatever color whenever I want to. 
 
That being said, my client wanted this dresser red and it's perfect timing for fall.  So, consider this my Ode To Fall!! :)
 
The dresser was in good shape so it didn't need a lot of prep work.  She wanted me to use MMS milk paint in Tricycle.  I don't work with milk paint a lot, but I know it kind of has a mind of its own.  Not a good thing for a perfectionist with a touch of OCD such as myself.  She wanted it chippy and I was actually afraid it wasn't going to be chippy enough.  The finish was very flaky so I ended up sanding the whole thing down with 150 grit.  That sounds like a lot of work, but it really wasn't.  The finish was so old it came right off.  I know milk paint bonds really well to bare wood so I ended up staining the drawer fronts dark and then giving them two coats of poly so the paint wouldn't bond as well.  It actually worked really well and I love the texture of the paint. 
 
We need to talk about that.  Like I said, I'm a perfectionist and I've prided myself on my finish.  I like it smooooth and even.  Well, that is not the nature of milk paint so I had to put all of that aside and just go with it.  The finish is still smooth, but milk paint flakes and chips and there's a lot of depth to the paint (meaning there's a lot of variation in the color).  I took a few close ups so you could see what I mean if you aren't familiar with milk paint. 
 
I also chose to use hemp oil instead of poly (sorry ladies, you may stone me, but wax is just too much work for this gal) to really deepen the color of the paint.  It really makes the color come alive.  Love that!
 
 
 Before
I've shown you my ugly garage so many times it doesn't even bother me anymore! :)


 After

I'm loving it!


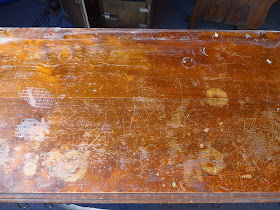
 This is the top before.  Yikes, right?!!
 
I sanded it down with 150, making sure to remove any small scratches that the sandpaper may have left behind.  Gave it a coat of Java Gel and 3 coats of Minwax Polycrylic.
 
 This is the top after (ignore the dust specks, we were having 70mph winds when I took these pics!).  Can you believe it's the same top?  I love restoring a nice piece of wood!


 I really do like the texture of this!  I love milk paint for the authenticity it brings to a piece.  Sometimes distressing can look contrived, but milk paint never does.  It looks like what would naturally happen over time.


 It's a contradiction of smooth and flaky. ;)


color = Tricycle MMS
top coat = hemp oil