Showing posts with label decopauge. Show all posts

Wednesday, April 29, 2015

Oak Jewelry Stand

I really do have a problem.  I was driving my daughter to school on Friday and saw this on the way (we only live a couple of blocks from the school).  I sped up a little and Ania asked me what I was doing.  I told her I had to hurry so I could get back there and grab it before someone else got to it.  She gave me the look (I thought I was the one that was supposed to give "the look") and I said, "What?"

I knew right away what I wanted to do with it and it turned out even cuter than I thought it would (and I kept telling asking hubby if he thought it was cute and he gave me "the look", too!  Humph!).


 BEFORE

I love the shape of it, but the oak had to go.  Sorry, oak lovers. The little drawer fronts were perfect for my idea and some of the original trim was missing anyway, so I just took the rest of it off the drawers.


 AFTER

So much better!


I've been getting a lot of questions about how I do my decoupage and how it turns out so smooth.  I really don't have a secret.  I use scrapbook paper so it's a little heavier and I think that helps.  I also do a thin layer of MP because if your paper gets too wet then there's a better chance of it wrinkling.  I lay the paper on and smooth it out.  You can use a credit card or flat surface, but lately I've just been using my hand.  Be gentle, or you can tear the paper.  I wait for it to dry all the way before I do the top coat of MP.  It usually turns out pretty nice.


These knobs with this paper remind me a little of French Country and I just love it. 


Thursday, February 5, 2015

Vintage French Provincial Vanity

I see a lot of French Provincial furniture that looks like this, but I don't think I've ever seen a little vanity before.  My client said it belonged to her husband's grandmother, so it's another piece that gets to stay in the family.  You know I love that. 

It was very outdated but an upgrade with black paint, new hardware, and these awesome vintage looking maps fixed that. :)


 Before


 After

Before it was a little blah (no offense) but now it has presence!  


 I still get a lot of questions about my finish.  I promise you it doesn't matter if you brush, spray, or roll a good finish comes from sanding!  It's more work, but the results are so worth it!  220 between coats, every coat. 


I like to use script on drawer fronts, but these maps were just something a little different.  I adhered them, sealed them, and then stained over them to darken them up a bit.  I finished with a coat of poly. If you use stain you need to top coat it with something as it can remain tacky if you don't. 


Tuesday, January 20, 2015

Vintage Server in (almost) Linen

I came across this little, vintage server by someone tagging me on my local FB classifieds page.  I just love that people are so thoughtful. Thank you! :)

The girl who had listed it did list the dimensions, but when I saw it in person it was a tad smaller than I had envisioned it.  It's such a sweet table.  I had a vision for it prior to seeing it, but upon seeing it in person that all changed. 

Because it is a smaller piece I wanted to keep it light and soft, but unique and maybe just a little bit fun. I am so drawn to soft turquoises (like Stefan to Elena, does anybody get that reference?) and I realized I've been doing it a lot lately!  Maybe I will finally have it out of my system. Ha! 


 Before

Cute, but a little ho-hum (ok, maybe a lot ho-hum!)


 After

When I finished it hubby came in the garage and I told him I wanted to keep it.  He had his back to me, but I could just hear the words he was trying so hard to contain and the look on his face.  He said, "Funny, cuz I think you should sell it." ;)


 I am still in love with Linen from General Finishes, and just lightened it a tad with some white paint I already had.  I wanted the drawer to compliment the paint, but to be different and stand out. I was a big scrapbooker before I started painting and have a ton of paper left over.  But, wouldn't you know in those drawers full of paper I couldn't find just the right one and had to make a HL trip. 
I'm glad I did!  

I also tried a couple different knobs, but liked the presence this pull had against these muted colors. 


Someone had previously refinished this piece.  When they did the stain they didn't wipe it all the way off and it hid the grain in the wood.  I sanded the top down with 150 and stained it with two coats of Java Gel (because I am completely, totally, and irrationally obsessed with it!).  I finished it off with 3 coats of Varathane in satin.


 I had this wooden applique left over from a different project and thought it would be a nice addition to the blank space on the back piece. I just did a wash of French Blue from Old Towne Paint and wiped off the excess.  Craig said, "It's subtle and ties the back in with the drawer. I like it. "
Who knew? ;)


 I also did the top edge of the drawer with the paper and I think it's my favorite part of the whole piece. It's the finishing touches I like the most!  It's so stinking cute! :)


Thursday, December 11, 2014

Antique Pedestal Table in Linen

This table was another piece destined for the dump,  It had been sitting in a storage unit for a while and it was pretty rough.  It's quarter sawn oak and was really dry, so the grain was really open.  I don't like oak to begin with and when it's dry it's even worse!  The drawer was stuck tight and took some major muscles (not mine!) to open it.  Once open I had to sand down the top edges and sides so it would slide freely again.

I had a vision for this piece and when I was part way through was not liking it at all.  I finished it, stared at it, hemmed and hawed about it, fretted about it,  and then decided to undo what I had done.  I was so much happier when I did and new inspiration struck.  Love when that happens.  

I haven't distressed anything too heavily in a while and got a little carried away on this one and had to go back and repaint parts of it. Lol.  It's still more distressed than I normally do, but I like it that way. Especially with all that dark wood showing underneath the light paint.  Still makes my heart go pitter patter. 

I love how it is soft, but still has presence.  I'm loving the pedestals and chunky feet.  But, my favorite part is THE KNOB!  It's amazing!  It was the only one.  If any of you shop at Hobby Lobby you know they have their knobs in bins and on the front of the bin there is a little hole drilled with the knob (that's in the bin) attached to the front of it so you know what's in the bin (did any of that make sense?).  Well, there were no knobs in the bin, but I just could not walk out of there without that knob, so I unscrewed the one from the front of the bin and away I went.  I was looking around like a ninja because I felt guilty.  I don't know why, it was a sale for them that they wouldn't have had otherwise! :)


BEFORE

You can see the damage on the wood of the base (icky spots) and the top looked the same. My sweet hubby started sanding on it with the grinder (I normally do my own sanding but this table happened to be in his shop so maybe he was feeling a little possessive or maybe he just wanted to see what was under that nasty stain or maybe he was just being a super nice guy!) and stopped about 30 seconds in and says, "We didn't get a before pic!"  Awww...love that guy!


 AFTER


I can't believe how good it turned out!


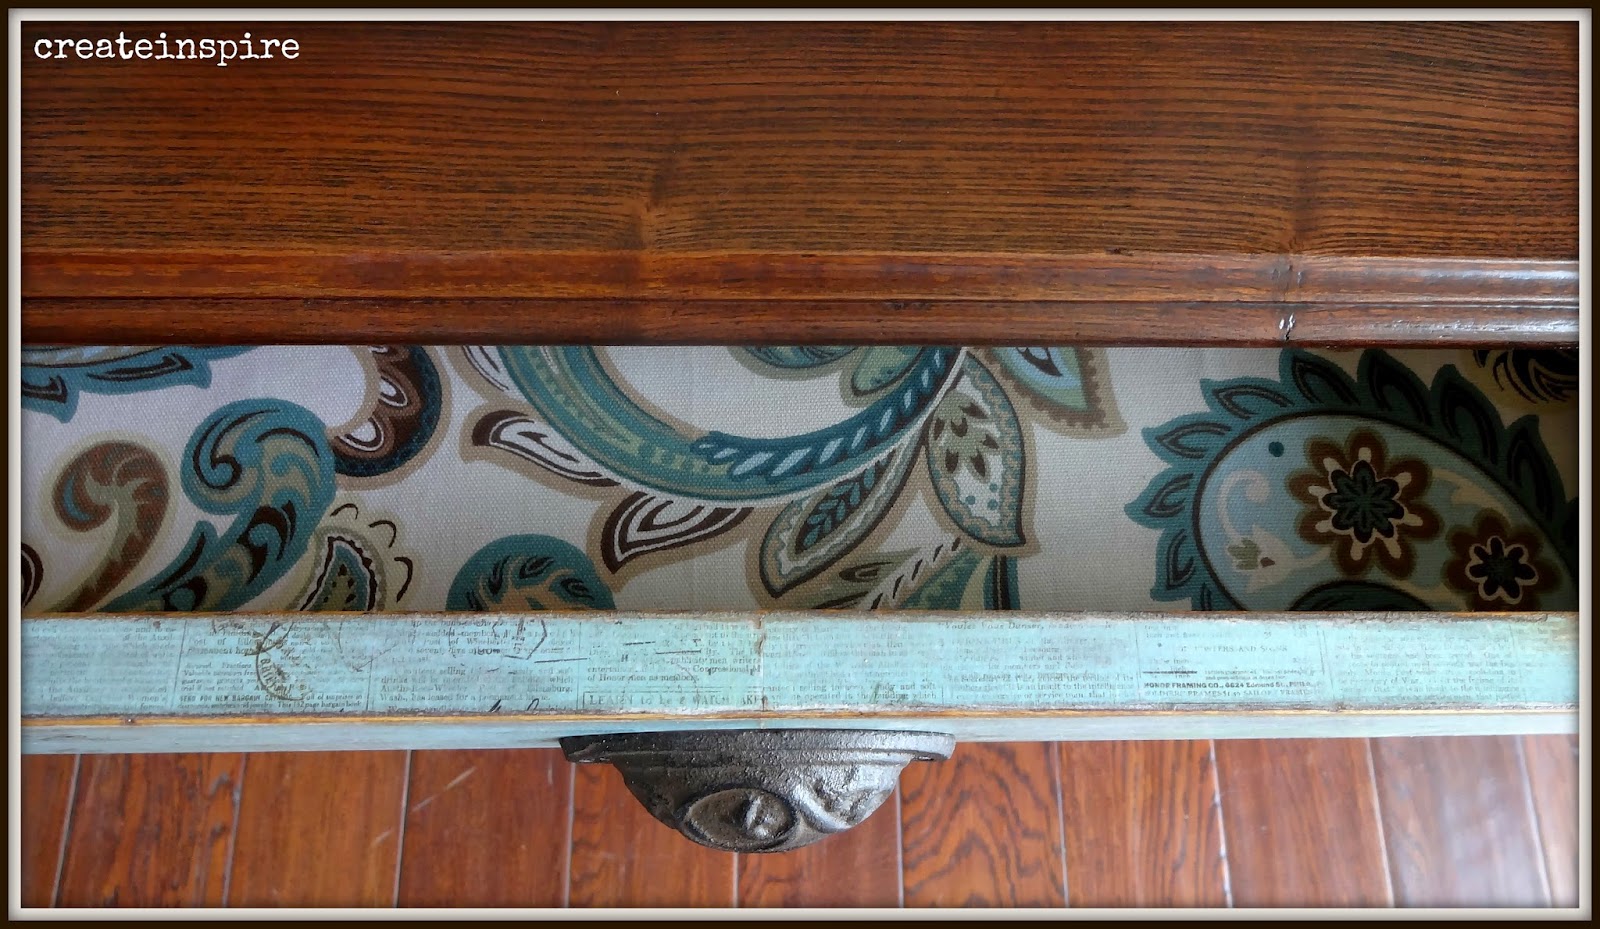
 I had originally painted the drawer front, the feet, and the trim at the bottom of the pedestal a deep greige and heavily distressed them.  It just didn't look right.  The dark drawer messed with the slim profile of the table skirt (visually chopped it in half) and the dark trim at the bottom of the pedestal made the legs look short.  Kinda reminded me of the rules of What Not to Wear. Lol  I decided to use paper on the drawer front instead and found one in my stash that just happened to be the color of the table!  I love how there is a balance of the green and cream so it draws the eye right across the front without making it look like a block in the middle.  Know what I mean?


 The. Knob.

.  It draws the eye down from the dark top to the intricate bronze inlay, and the rustic cream edge allows it to pop against the green paper.  I would sleep with it under my pillow if that didn't make me the biggest weirdo ever!


Chunky feet! 
 Thank you Sausha from Sweet Pickens for making me aware of chunky feet!


One of my most favorite things is light paint over dark wood.  
*sigh*


The top actually wasn't too bad once we sanded the bejeebers out of it.  We started with 80 on the grinder and then I smoothed it out with 150 on the orbital.  I hardly ever use two coats of Java Gel from General Finishes but this puppy needed it.  There were a few dark spots, but now they're hardly notiecable.  It's pretty Tiger Oak and the little hole in the top (see it on the left side?) just adds character. I didn't want to fill it because I wasn't sure how it was going to stain and with all the grain it would have just looked like a dark spot anyway, so I left it. 


 I'm happy. ;)


Tuesday, December 3, 2013

Vintage Vanity

I haven't been on CL in a while, mainly because it's so hard to find anything good anymore!  I must admit, though, I am a very impatient shopper.  If I can't find it in the first 5 minutes, forget it!  I know, I know, it's not very lady like, is it? ;)  

BUT, luckily I saw this little gem in the first few minutes and I begged lovingly implored my wonderful hubby to come with me to pick it up.   I normally won't drive very far for a piece of furniture, but pickins are so slim I made an exception. :)  It was in a garage and dark when we got there (and it was COLD--you know how I am with that, right?!!) so we chit chatted for a few minutes, threw it in the back of the truck, threw it in the garage when we got home, and then snuggled on the couch so I could warm up.  Ha--I told you I was a baby!! 

The next day I went to look at it and could not wait to paint it to cover up all the ugly fake wood grain! There were beautiful mahogany tops and the sides and middle drawer were part mahogany but the rest was some fantastic faux paint job (considering the era it came from it really was interesting).  The veneer on all the small drawers was almost off already, so I just peeled it the rest of the way and sanded it all smooth. 

 Before

Since it has so many great details and is very curvy I wanted it to be soft, a little old-fashioned, and very feminine.  


After


I worked backwards on this one and started with the knobs and drawer fronts.  I've had this paper forever, but could never find the right piece for it.  I love how muted the colors are and how subtle the print is.  It's a little romantic and ultra feminine.  Pearls just felt right so I went with it! :)


It had the original bakelite pulls, but (I'm so sorry for saying this) they were hideously ugly and one was cracked.  Guilt was eating at me so I simply took out the middle part and kept the metal pull.  I think they're just fabulous now! 


 I have a thing for leaving the tops natural whenever I can so I was so happy this had beautiful mahogany veneers on it.  I hand sanded them (didn't want any oops! and then no wood tops for you!) and stained them in Espresso (my new fave!).  I love the variation of color in the wood 


She's also got fabulously chunky feet (I hope no one ever says that about me!).


Love these curves!  I used a soft beige/gray on the body and a soft white on the details.  I wanted it to be two tone, but I didn't want it to look too busy with the wood tops, and drawer fronts.


 Great detailing on the top of the mirror (which happens to be ginormously huge!!).


I think she's soft, sophisticated, and girly all at the same time!

This vanity was featured by:
Deborah @ Green Willow Pond

Thank you!


Linked up here:
Saturday:

Sunday: 

Monday:

Tuesday:

Wednesday:

Thursday:

Friday: