Showing posts with label beige. Show all posts

Friday, July 24, 2015

Hutch in Millstone

This is another piece found by Sandy (oh, what would I do without her?).  I called about it and set up a time to go see it because the person selling it was selling it for an elderly couple.

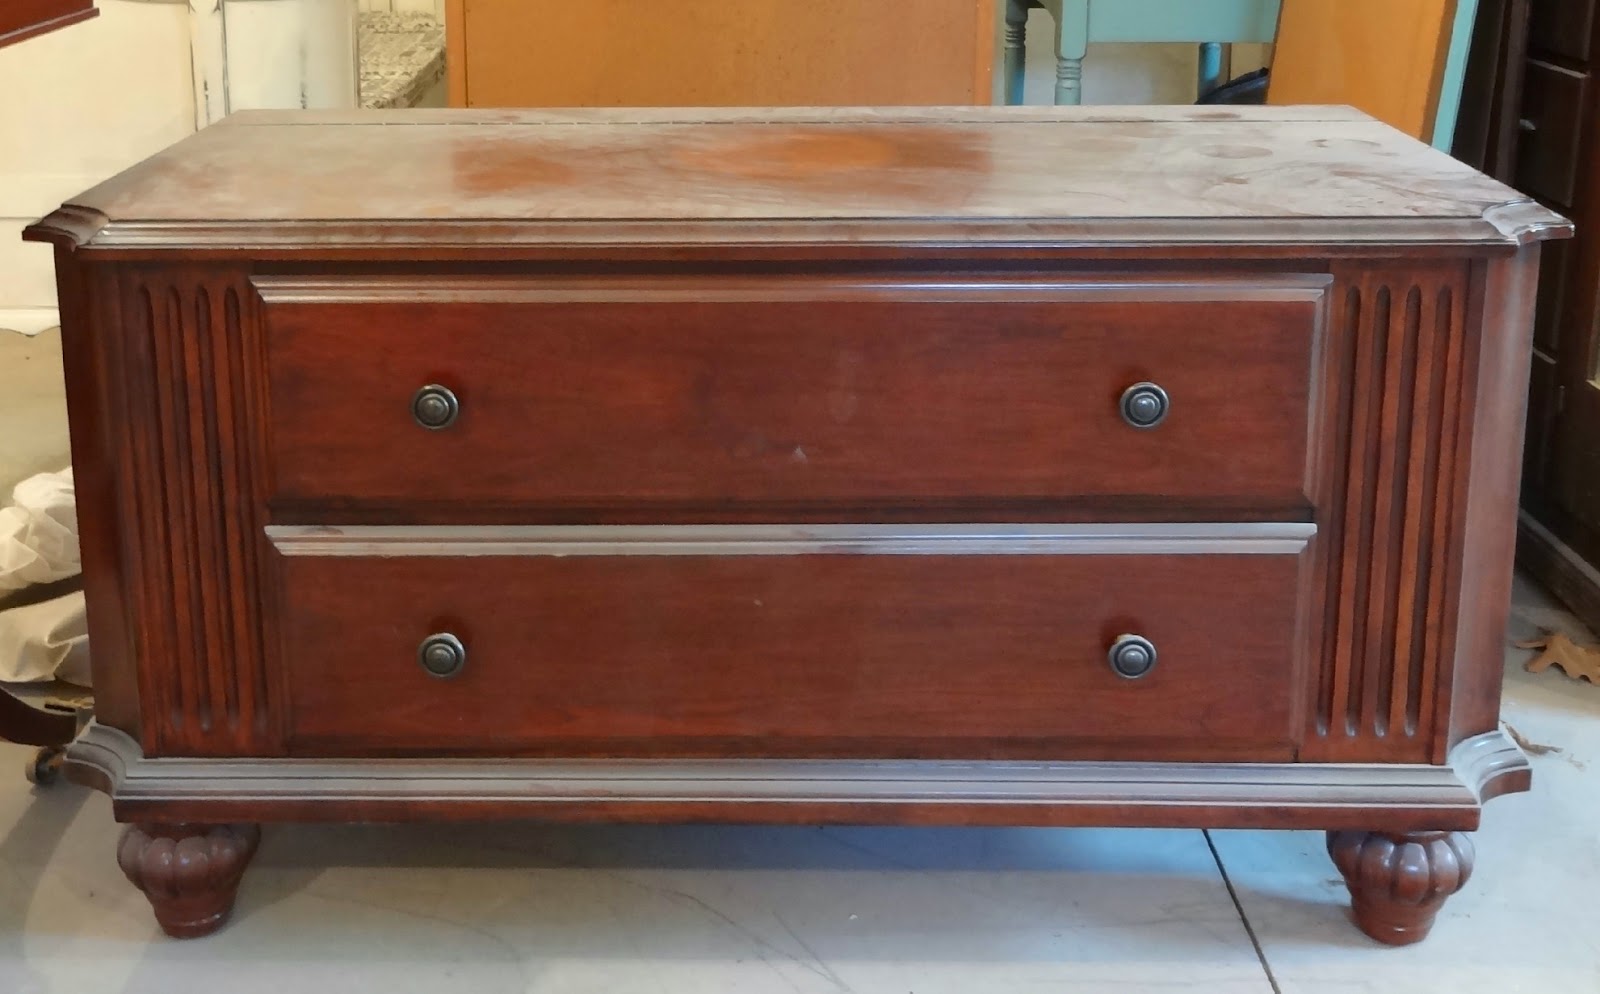
When I got to their apartment I was a little disillusioned with the piece but the elderly couple was moving and needed to get rid of it and they needed the money.  Now, my wonderful Father in Law is always telling me how I can make a sow's ear into a silk purse (don't you just love that saying?).  So, as I was contemplating hauling this thing down the stairs (when I didn't really want it) I remembered what he always says to me and decided I would take it.  The man was so happy and I knew, even if it had to go in the garbage, that I had done the right thing. 

When I got it home I started looking it over and other than being covered in bird poo it was in really nice condition.  

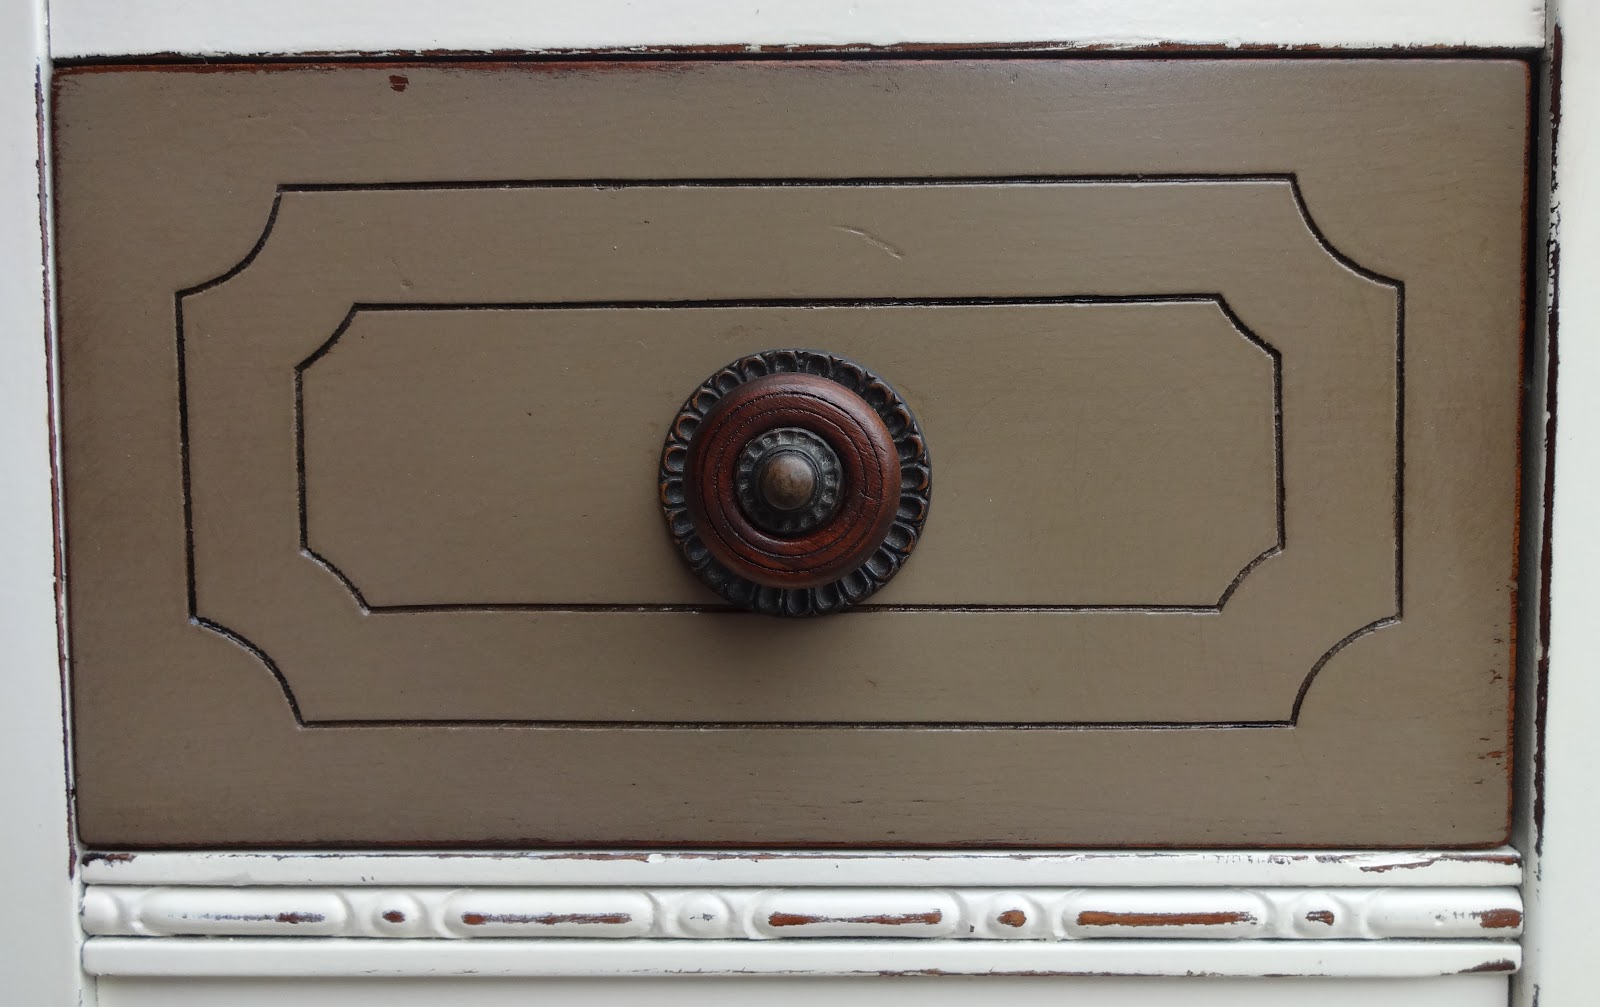
Ever since I used this bird fabric to line some drawers a couple of months ago I knew it deserved to be front and center on a piece and this was the perfect little project for it.

I chose to go neutral with the color scheme so the fabric would be the focal point. 


 BEFORE

I hate those chunky monkey handles in the middle of the doors, so I filled the holes and replaced them.  And, guess what?  The moldings on the door fronts are actually plastic (they usually are on pieces like this), so I wasn't sure the wood filler was going to work, but it did fine.  :)


 After


The color is Millstone from General Finishes and the door fronts are done in Antique White with a little Millstone added in. 


 So cute!

Can't you just see this full of white towels?


 I replaced those yucky pulls with these rusty iron knobs. Much better!


Thursday, May 14, 2015

Cedar Chest in custom stone (color)

I almost kept this one for myself and left it just the way it was, BUT it didn't fit! :(  Big boo!

This is not an antique, but it is beautifully made and such a unique piece.  The top opens and the chest part is lined with cedar and then the bottom drawer opens and it is also lined with cedar.  I just love it. 

When I sold the highboy earlier this week my client said she was looking for a chest, too.  I was sad to give it up but I knew it was getting a good home! 


 BEFORE


AFTER


She wanted it to "match" the highboy, but not be "matchy-matchy".  She also wanted to go a little darker with it.  It's such an elegant looking piece so I like how the neutral color lets all those pretty details stand out. 


I mixed the colors Weimeraner from SW, Wheat Bread from Behr,  and Driftwood from General Finishes to get this color.

Originally she had wanted the top wood and the rest painted.  Problem:  when I got to looking at the top I wasn't sure exactly what it was made of or what kind of treatment it had on it.  It needed to be refinished because it had scratches on it, so it had to be painted.  So, I asked her if I could leave the drawer fronts wood instead.  They aren't perfect but in a lot better shape than the top.  I didn't do anything to them but wipe them down. ;)


My favorite part about this chest is the feet!  I will quietly admit I did sit on my garage floor and rub them (just a little and not for too long...shhhh).


Friday, May 8, 2015

Chest of Drawers in Wheat Bread (Behr)


I think I've done close to 500 pieces of furniture in the last 4 years.  Sometimes that makes it hard to feel inspired or to continue to be original.  I find myself thinking, "Ok, what can I do to make this piece really stand out?"  It's easy to get caught up in trying to do something "different" all the time.  

This week I realized that sometimes I just need to take a step back and breath.  It's not about coming up with the most original finish...it's about helping each piece be the best it can be.  And, at times, that means less is more.  When I really started looking at this Basset I realized what a beautiful piece of furniture it really is.  It is very well made and in almost perfect condition.  It has a subtle bow front (typical of French Provincial) and soft lines. I've been doing a lot of color and floral in the past two weeks and I knew that wasn't the direction I should go for this particular piece. 

So, in keeping with the feel of the piece I decide to go monochromatic and to keep it soft looking. 

I'm a little sad because pics just don't do this one justice.  I need a nicer camera. ;)


BEFORE


AFTER

The color is Wheat Bread from Behr and it's a beautiful, subtle greige.  I also decided I didn't want to distress this one (I know, take a few seconds to collect yourself) because I didn't want to break up the beautiful lines of the piece. 


I used Krylon's Make It Stone textured paint for the inset of the drawer.  I like how it doesn't distract from the overall look of the piece but adds just a little something. The lighting is washed out in these pics, but in person it's more noticeable. 


I rarely find a piece that still has the keyhole covers (even if their faux like this one).  I was so happy this piece still had it and that it looks amazing!  I love the patina on it and left it alone. 


 I also didn't do anything but dust the existing hardware.  I love the highs and lows of aged metal. 


Such a gorgeous top (that I had to redo twice-ugh!) and it was well worth the trouble it gave me. :)


 Beautiful legs and curvy skirt! 


I love the contrast of the texture with the velvety smooth paint.  And, the bow front just makes my heart beat a little faster.  


This piece would make a wonderful Mother's Day gift!  (hint, hint!) :)


Saturday, June 28, 2014

Repurposed Hutch Top

Do you ever feel like you're in the Twilight Zone?  I'm totally a routine person.  I don't function well without one, so the beginning of summer is always a little hard for me.  I stink at transitioning from the school year to the summer routine.  And, my sweet little daughter asked me to not paint this summer so we could spend more time together and I agreed (I needed a break anyway). This piece was my last custom until school starts again.  It was originally the top to the buffet I just finished up.  

My client wanted to use the pieces separately, so she had the same cabinet maker that made the tops put legs on the hutch so it could be used as a book shelf.  I really love the idea and thought it turned out so great.  It was definitely dark and in need of a pick me up! 


 Before


 After

I love this color.  It's subtle and sophisticated, especially paired with the dark wood top.   


 *Confession:  People always ask me about glazing and I never tell them that I absolutely hate glazing.  I'm not sure why, I just do.  But, I do like the way it looks when done lightly.  


I'm not sure when you'll see me again, but I hope you're still around when I finally make another appearance!! :)

Have a terrific summer!!

Tuesday, June 17, 2014

Bow Front Buffet in Coco

Hello!
I'm back from our little vacay to Arizona.  We had a lot of fun and I think it was a good little get away for all of us.  Ania asked me what my favorite part was and I think climbing Camelback Mountain was it.  Which is funny because I honestly thought Flight for Life was going to have to remove me from the top.  Thank goodness coming down was easier on the ol' ticker than going up!

I have a few customs to finish up before I'm done for the summer.  I can't say, at this point, that I'm sad about that.  I'm hoping the saying "absence makes the heart grow fonder" will be applicable in September. :)

This buffet is actually the bottom of a buffet/hutch combo.  My client wanted to use them as two separate pieces so the bottom will be used as a media console and the top will be repurposed (next project so stay tuned!).  When they took the hutch off, the top of the buffet needed to be replaced which is why it looks new. :)  A good friend, who happens to make custom cabinets, made the top for my client and then she dropped it off for some TLC.  And, boy did it need it!

It's all mahogany veneers and they were in pretty rough shape in parts.  I ended up having to remove all the veneer off of one of the drawers, the edge of the top drawer, and the whole bottom strip.  I sanded it  smooth, stained it dark with java gel, then sealed with shellac before painting. 


 Before


 After

I never really jumped on the chalk paint wagon, so still pretty much use latex.  But, I do love some of ASCP colors.  This one is very close to Coco, but is really Virtual Taupe by Sherwin Williams.  I then glazed it with a dark brown glaze. I use a damp cloth when wiping the glaze off so it's not so dark (as opposed to wiping with a dry cloth) or streaky.  The only problem with this is if your paint hasn't cured you can rub it off easily.  Of course, I was too impatient and ended up having to repaint parts because I rubbed too much paint off.  You would think I would have learned by now, but nope!


One of the original pulls was missing so I replace them all with this cup pulls (my favorites) and kept the originals on the doors.  The pulls had been sitting in my garage for a while so they were pretty dusty.  When I washed them off it dried them out and they were really dry looking (which is not what I was going for), so I simply rubbed them with some vegetable oil and then wiped clean.  Good as new! 


 The top was new so was very easy to work with.  I used  Java Gel by General Finishes and then finished with 3 coats of Minwax Polyacrylic in satin. Ga-orgeous! 


I almost always paint the insides too!  


I'm still getting over some hard feelings this baby left me with so I can't quite say I love it...check back with me tomorrow. ;)

Wednesday, July 10, 2013

Antique Dresser

I love empire style dressers and this one caught my eye with the slight curve to the front drawers and the detailed pieces on the bottom.  She's old and has seen her fair share of wear and tear, but is still solid as a rock.  It's true when they say "they just don't make them like that anymore"!


Before


 After

This was a pretty straight forward makeover if you don't count the fact that I had to paint it twice because I decided I didn't like the first color I did.  And, I'm not going to tell you what it was or show you because it would break my little heart if many of you said you liked the first color (all that extra work for no reason)! ;)

Sales have been a little slow here so I told my hubby, in a moment of discouragement, that I was just going to paint it black so it would sell (even though I didn't want to).  He got home that night, saw it sitting in the garage, and here is the conversation that followed:

Him:  "That's not black."
 Me: "I know."
Him: "Why isn't it black?"
Me:   "I went to paint it black and it told me not to."
Him: "What?"
Me:  "It didn't want to be black.  It told me it wouldn't look good black."
Him:  "It did, huh?"
Me:  "Yup."
Him (giving me "the look"):  "Ok."

lol

I'm always saying that almost everything looks good black, but I just couldn't do it.  I love this softer color and the tone on tone knobs with it.  It's such a bulky piece that I liked the idea of lightening it up, but didn't want white, so it's actually a really creamy beige.  


 She was pretty beat up (lots of dents and dings--most of which were too deep to sand out), but I like how that adds character to a piece.  Like I always say--it's part of her story now. :)  There was a pretty wood top so I sanded it all down and stained it then finished it in a satin poly.


I love these knobs and, of course, I bought them from Hobby Lobby.  I love Hobby Lobby and I don't know what I would do without their great selection of fun knobs and pulls, but I feel like I do have to give some sort of warning here.  I've been burned many a time when I got my hardware home and parts were missing (nuts, washers, etc) or the knob was defective in some way.  These happened to have nuts that didn't fit the post and since Hobby Lobby is 45 minutes away I didn't want to return them.  I went to my local hardware store and found different nuts and also bought lock washers so they would stay on.

  I only say this so if you are buying hardware there you make sure you check to make sure all the pieces are there and work properly!

Linked up here:

Thursday, May 30, 2013

Depression Era Hutch II

I loved the first antique hutch I found.  I always wish I had two of everything, so I can see what they would look like painted differently.  I haven't been able to find very many good pieces lately so I practically jumped off my couch when I saw this beauty on CL! 

 I listed it as a piece available for refinishing even though I already had an idea what I wanted to do with it.  It sold right away and I was a little bummed because I didn't think I would get my way (haha ;) ).  Well, fate was smiling down on me again and my client and I were on the same page, so I got to do it how I wanted and have it sell right away!! Woo hoo! :)

 Before


 After

You know what I'm going to say, right?  I la-la-la love it!!!


 Check out all those yummy legs!!


 She picked out a picture of a hutch done in Old White and Coco (ASCP) and I took it to Sherwin Williams and found colors that were close.  I ended up using Decor White and Virtual Taupe.  I loved the taupe but it was a little blah so I stained over it Dark Walnut and it made the color so rich.  It looks so good against all that creamy white.  


 Check out these stunning knobs.  There was no way I was going to change out this hardware.  They were looking a little rough so I just went over them with some Danish Oil in Dark Walnut.  It's a stain and sealer in one, so I just wiped on and wiped off.  Easy peasy!


 She wanted a pop of color inside so I used Duck Egg (the real thing).   When they built it they actually put the shelves in and then put the back on and let me tell you this is one solid piece off furniture--there was no way that back was coming off!  The shelves wouldn't come out so I had to paint around them.  Not so fun.  


 This is so my favorite part of the whole thing!   She has a great curvy skirt and this perfect little detail to set it off.


Have a fantastic weekend!!

This hutch was featured by Karen @ Redoux
Nita @ Mod Vintage Life
Mary @ Boogieboard Cottage
Sharon & Denise @ BeBetsy
Nancy @ Artsy Chicks Rule
Kelly & Kristi @ Lolly Jane
Sharon @ Elizabeth & Co.
Deborah @ Green Willow Pond
Handy Man Crafty Woman

thanks so much ladies!


Linked up here:  

Saturday:

Sunday: 

Monday:

Tuesday:

Wednesday:

Thursday:

Friday: